Almost all classrooms have the ability to grow plants outside, even if it is only in containers. Many schools have extensive grounds. Some fortunate schools are surrounded by a natural area, but frequently, the landscape is mainly ornamental plants that are native to other regions. How many of the plants around your school are from your local ecosystem? This is an important question to address.
Humans have taken over a significant part of our planet. Our buildings, lawns, roads, and fields exclude the native plant communities and all the animals that rely on them. It is heartening to know that this is a problem that we can address simply by what we choose to plant. We can give important support to insects, birds, and other life in our native ecosystem. It is good for all the life of our ecosystem – including us.
Children can learn about what we can do from the Young Reader’s Edition of the book, Nature’s Best Hope: How You Can Save the World in Your Own Yard. It was written for adult readers by Douglas W. Tallamy and adapted for younger readers by Sarah L. Thomson. Older elementary and middle school children can read this book to learn about the problem and ways to help.

I learned important ideas from this book. I knew that we need to grow plants that support pollinators with nectar and pollen. I had not fully grasped the need to plant host species for caterpillars. These plants are vital to the insects’ survival, but beyond that, they play a huge role in the support of bird populations. It is because of the food baby birds eat. They cannot feed on the seeds or adult insects that their parents consume. Instead, they need soft-boded caterpillars, and their parents have to find thousands of these insect larvae to raise a nest full of babies.
How do we find plants that support our insects and birds? The National Wildlife Federation is a good source of this information. See https://www.nwf.org/Garden-for-Wildlife/About/Native-Plants. This website features a native plant finder. You enter your zip code, and it gives you lists of plants that host the most butterfly and moth species. These plants will help provide food for the birds in your area.
What is in our gardens now? Many of the ornamental species we grow come from other parts of this continent and even from other continents. People love to have a variety of plants in their gardens. We don’t have to get rid of all our exotic species; we can add native plants. A good goal is at least half in native plants.
The lawns in the US take up an amazing area. Tallamy writes that in the state of Maryland, there are twice as many acres in lawns than in all state parks, state forests, and wildlife management areas put together. It is the same in most Eastern states.
Schools need playing fields and spaces for children to run and exercise, so it isn’t practical to get rid of the grass. All of the area around the school doesn’t have to be a lawn, however. A border or corner can be set aside for native plants. Areas that get little foot traffic can be changed to a meadow of mixed native plants, very attractive to people as well as insects. Less grass means less water for irrigation and less mowing and fertilizing. Cutting back on fertilizer is important for greater ecosystem health because fertilizer runoff promotes harmful algae blooms and lowers drinking water quality.
The University of Florida Thompson Earth Systems Institute has information about the importance of insects and what we can do to help rebuild their populations, which are declining. See https://www.floridamuseum.ufl.edu/earth-systems/the-insect-effect/. This website has guidelines for making your outdoor spaces insect friendly. The decline in insect species and numbers doesn’t make headlines like other climate problems, but it is a critical one to address.

Beds of flowering plants offer many possibilities for botany studies, including pollinator watches, observations of bud formation, finding flower parts, and watching fruits develop. Diversity – having many different species – is important for survival of ecosystems. Children can compare the life they see in a flower bed planted with many native species versus a grass lawn. So many good learning experiences await in a richly planted landscape!
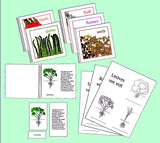
Many times, children see plants presented as static objects rather than dynamic, interesting living things. I have a new card set that can help you bring more liveliness and fun to botany. It is called “What Flower Is Growing Here?” The set has close-up photos of buds and on a second card, the flowers that unfold from them. Children look at a bud and see if they can match it to the flower in bloom. There are 16 different species of plants featured, and their study can stimulate bud observations in both spring and fall. You can see the set here. https://big-picture-science.myshopify.com/collections/montessori-botany-materials/products/what-flower-is-growing-here .


There is a sentence or two on the flower card that helps children understand more about the flower. For more advanced children, there is a text card for each plant that gives its classification, more details of its development, and its origin.
Annuals and herbaceous perennials grow most rapidly in spring and summer. They produce their buds and blooms from spring to late summer. Most of them have finished their activities in autumn. Herbaceous plants that are pictured in the “What Flower Is Growing Here?” set include petunias, pansies, poppies, and peonies. Zinnias, hollyhocks, nasturtiums, lilies, and columbines, along with daffodils, daylilies, and the bearded iris, round out the spring and summer bloomers that die back in winter.
In autumn, there are structures to observe in another group of plants, the shrubs and trees. Several woody plants form conspicuous flower buds by autumn and hold them over the winter before they bloom in spring. All of them form leaf buds, and many form flower buds that are hidden in the leaf buds. The woody plants in “What Flower Is Growing Here?” are the rhododendron, flowering dogwood, and star magnolia. All three of these form their flower buds in the late summer or early autumn. They have flower buds that children can easily see all winter long. Other woody plants that form visible flower buds in autumn include alders (shown below), birches, forsythias, and the silktassel (Garrya).

Considering these two categories of plants, there is some flower bud to be seen almost year round. After children have worked with the “What Flower is Growing Here?” cards, they are primed to find buds on nearby plants. They can even look at weeds with a hand lens and may be able to find tiny flower buds there. Following buds through their development is an important activity that helps children see plants as alive and dynamic.
When children see the buds during the winter, they will be primed to observe the big changes that come in spring. If they keep a watch on annuals and perennials in the spring, they may spot the buds well before bloom time. It is exciting and amazing to see what a large flower emerges from some small buds.
The same sort of excitement can come in spring when the leaf buds start to open. Woody plants form their leaf buds in the previous summer or autumn, and most are covered by bud scales. Giving children an opportunity to observe next year’s leaf buds will prepare them to appreciate the swelling bud scales and leaf emergence in the spring.
Enjoy watching your plants bring forth their buds and flowers.
With our world in such an unusual condition now, I find the plant world a sane and stable refuge. My garden is a stress-reliever in the best of times, and it is a special help to me now. With our unusually cool and moist weather last month (Is anything usual?), the plants have done well. There was a bumper crop of cherries, and my flowers have been blooming enthusiastically since early spring.
The weeds have also done quite well. Weeds are a good source of material for botany lessons, and they are found all over, in city sidewalk cracks as well as gardens. Their adaptations make them very abundant. There are few problems with uprooting them and dissecting them. It is a good thing to learn your local weeds and know some of the lessons they offer.
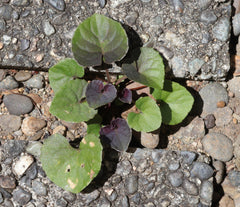
First, perhaps I’d better say what I mean by a weed. It is plant that grows where it is not wanted and displaces or damages the plants I want to grow. In my garden, some violets are weeds because they spread all over. The one below is especially weedy.
Weeding is applied leaf shape work. Learning to recognize the local weeds is a great gardening skill for children or adults. First, children have to recognize the leaves of desirable and undesirable plants. It takes time to carefully observe the garden, and it is important to have a guiding adult’s help to learn what to keep and what to uproot.
I don’t mean that children have to give the weed’s leaf shape a formal name. Many leaves can be recognized by overall appearance, and noting the leaf’s traits, such as lobes, teeth, or a particular surface texture, can help one identify the plant. Whether the leaves are opposite, alternate, or whorled around the stem is also an important trait, as is the overall size and shape of the plant.
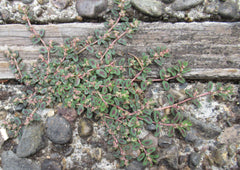
Weeds helps hone one’s observation skills. One key to being a great weed is to escape detection for as long as possible. If your children want to find weeds to study, they will have to look carefully. The spotted spurge is a champion at hiding. The dark markings on its leaves make it hard to see against the soil, and it is a prostrate plant, one that grows very flat against the soil. The overall look of this plant, its milky white sap, and its leaves are a good way to recognize it. Warn children that the sap is very irritating, which brings up another reason to know your weeds – learn the hazards that children may encounter handling them. They will need gloves if they are pulling or digging spurges.
Every spring, I pull the dozens of little maple seedlings, which I recognize by their toothed, opposite leaves. There isn’t enough room for them to grow where they have sprouted. The oak seedlings from acorns that jays and squirrels planted sprout leaves that may not look like a mature oak (see below). I want to pull the little oaks quickly before they grow deep roots and are harder to remove so I need to look for their young leaves.

Weed roots can provide interesting material for study, particularly if you can extract most of the root system. Here is a blackberry seedling that I pulled from soft soil. I was impressed by the length of its tap root. Note the transition from the stem to the roots. To make sure the weed doesn’t grow back, you have to get all the stem and the upper portion of the roots. If the top of the root remains in the soil, it can grow new shoots.

If you pull up a red-root pigweed, you’ll recognize it. It is a member of the notoriously weedy amaranth family. The plants are capable of making thousands of tiny seeds.

You can make illustrations to help children recognize weeds by photographing the plant or by placing a specimen that you have collected between two acetate sheets and scanning it or photocopying it. The acetate will help keep the scanner or copier clean.
A field guide to weeds is a great help for identifying them. There is the excellent Lone Pine Guide, Weeds of Canada and the Northern United States for those regions. In the Midwest and Rocky Mountain regions of the US, Weeds of the West, published by the University of Wyoming, is very useful. Northwest Weeds by Ronald J. Taylor is a helpful guide for that area of the US. If you are in the western US, the children’s book, Outlaw Weeds of the West by Karen M. Sackett, is a good resource for learning about weeds and their adaptations. If these do not cover your area, look for a local weed guide.
Have fun getting down in the weeds!
Many people are surprised to learn that broadleaf trees are flowering plants. It is true that most of them do not have the showy blossoms that people associate with the word “flower.” Members of the rose and magnolia families aren’t subtle with their flowers. Any sighted person can tell they are blooming.
Other kinds of trees may have quite inconspicuous flowers. The blooms may be so subtle that most people, including children, do not notice them. Help your children see these structures as they happen briefly in spring.
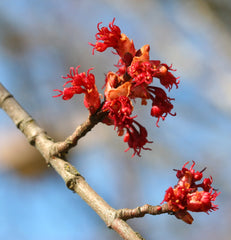
The red maples are among the first to bloom. Maples have a variety of flower structures and reproductive strategies. Some have yellow-green flower clusters that have both staminate and pistillate flowers. Others make extra staminate flowers and only a few with pistils.
Red maples are mostly dioecious – they have staminate and pistillate flowers on separate trees. I say “mostly” because I have seen and read other reports that a tree of one sex will sometimes have one branch that has the opposite sex flowers. This probably helps insure that pistillate flowers will receive the pollen they need to make seeds.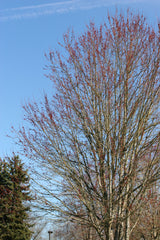
When the red maple starts to bloom, you may notice a red tint on the branch tips. If you can find a branch that is low enough for you to examine (try binoculars if the branches are too high), you will find one of two types of flowers. Neither has petals; both are small. The pistillate flowers (left) have two-branched stigmas showing. They are more intensely red than the staminate flowers (right), which look like a tiny pom-pom in reddish pink.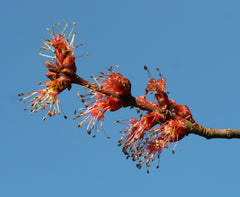
After the flowers bloom, the staminate flowers fall off. They have released their pollen, and their work is done. The pistillate flowers that received pollen continue to grow, and they develop long stalks with their young fruits at the end, often still bearing the drying stigmas. The fruits will become the maple keys; two grow joined together, but they split at maturity. This makes a maple fruit a schizocarp. Its two sections are samaras, winged fruits that the wind disperses.
Elms are another family of early bloomers. Their flowers are tiny, just two little furry stigmas surrounded by stamens. The developing fruits – again they are samaras – often color the tree a spring green and then turn brown before the leaves are completely unfurle d.
d.
Ask your children to think about the adaptation of blooming early, having wind-pollinated flowers, and having wind-dispersed fruits. They may be able to reason that the trees must bloom early so that their leaves won’t interfere with the pollen transfer. Some trees, like the elms, even disperse their seeds before the leaves block the wind from the mature fruits.
Swelling buds and developing leaves and shoots make great subjects for botany observation. Enjoy them with your children as the shoots and the spring develop.
Priscilla, April 9, 2018
For many years, I have promoted the idea of structuring botany around the flowering plant families. It’s a practical way of addressing the diversity of the angiosperms, and it is knowledge that works in many places and at many levels. For instance, organic gardeners need to know the families of vegetables so that they can do the proper crop rotation and fertilizing. Plant identification is much easier if one can determine the family. Flowers in the same family share certain features, so it is quite possible to recognize the family even if you have never seen that species before.
 To help you with your botany studies, I’ve just revised and expanded my PowerPoint slides on flowering plant families. This file is a pdf that can be printed to make letter-sized posters of 20 flowering plant families. The slides include text that describes the features of the flowers, and they show photos of family members. To round out this material, I’ve added a representative photo of 48 other families or subfamilies from all branches of the angiosperms.
 Perhaps you would like to do a Tree of Life diagram for the flowering plants. There is a good one in the book, Botanicum by Katie Scott and Kathy Willis. It is part of the Welcome to the Museum series from Big Picture Press (no relation to Big Picture Science), and it was published in 2016. The branches are correct on the diagram (pages 2 and 3), but they have just one example for each branch, and the orders are not stated. The example represents a whole order, which leaves out a lot. For example, the rose order, Rosales, is represented by a mulberry leaf. Mulberries and figs belong to family Moraceae, which is in the rose order, along with rose, elm, buckthorn, hemp, and nettle families. On the other hand, the diagram fits on two pages. It have to be much larger to be more comprehensive. All-in-all, the book is delightful and will provide lots of fun browsing. You will have to tell children that the page on fungi is a holdover from earlier definitions of botany.
The photos of families from my newly revised Flowering Plant Families Slides can be used to create a Tree of Life that has many orders. It gives a broader look at the families than its predecessor, and it is still centered on the families of North America. There are over 400 families of angiosperms worldwide. You don’t need to worry about being anywhere near comprehensive when you introduce children to flower families. Select the main ones for which you have examples from your school landscape, in areas near the school, or as cut flowers. If you or your children want to see the full list, go to the Wikipedia article on APG IV system (Angiosperm Phylogeny Group IV).
 I’m not the only one that advocates structuring botany studies around flowering plant families. Thomas Elpel has written a highly successful book called Botany in a Day: The Pattern Method of Plant Identification. It is further described as “An Herbal Field Guide to Plant Families of North America.” This book is in its sixth edition. It has color drawings as well as black and white ones, and these could be useful in classrooms. I have not recommended placing this book in the elementary classroom, however, because it includes many food and medicinal uses for wild plants. I do not want to encourage children to eat wild plants or use them as medicine.
 Botany in a Day is available from Mountain Press Publishing in Missoula, Montana, which also carries Elpel’s flower family book for children, Shanleya’s Quest. This book is a great one for elementary classrooms, and I strongly recommend it.
Enjoy exploring and identifying the flowers!
With summer nearing the end and fall coming fast, do your thoughts turn to leaves? If so, I’ve got a new card set for you -- Leaf Shapes and Margins. I’ve been collecting photos of leaves for many years. I selected 44 species that show a variety of characteristics and turned the images into cards for the classroom. Each card has a single leaf, sans background, along with its common and scientific name. Here's the card for the aspen leaf. It is half a letter-sized page (5.5 X 8.5 inches) in real life. You can see the details of its venation and the structure of its margin.

While I designed this set for older elementary children to use in leaf shape studies, it can be used by any age for appreciation of the beauty and variety of leaves. It takes math and botany to describe leaf shapes according to the Manual of Leaf Architecture by Beth Ellis, et. al., a highly respected professional botany reference. First one must measure the length of the leaf blade, and then divide it into five equal parts. Next one must find the widest part of the leaf blade and see if it falls within the middle fifth, in the basal two-fifths, or in the two-fifths nearest the apex. That determines elliptic, ovate, and obovate shapes respectively. An oblong leaf has about the same width through the middle one-third of the leaf blade. A linear leaf is at least ten times longer than it is wide. Those are the five major leaf shapes. This more precise system of determining leaf shapes replaces an overwhelming number of loosely defined traditional terms.
Warning – to prevent brain strain, do NOT measure in inches. Use centimeters, and you will appreciate why scientists (and most of the world) use the metric system.
For more math and botany, one can measure the angle of the apex and base of a leaf and decide if these angles are acute, obtuse, or reflex. For the base, there is one more situation, a circular base. The shape of the apex and base are also part of the leaf description. There’s more about this in my book, Plant Lessons: Introducing Children to Plant Form and Function.
Margins can have teeth, lobes, both structures, or neither. There are leaves that show all these situations in the set. The leaves include common trees, such as oaks, maple, and elm, as well as houseplants and weeds. Crabgrass comes in handy when you need a linear leaf. No one minds if you pull it up. The bo tree shows how a drip tip looks, not something you will find in your neighborhood unless you live in a tropical area.
The background information that comes with this new set includes a few sentences about each of the plants whose leaves are shown, a procedure for determining leaf shapes, and a table that gives the description of the leaves so you can check your results.
More than anything, I hope this card set inspires all ages to look more closely at leaves and appreciate the wonderful structures of these food factories for life on Earth.
Happy Fall Botany!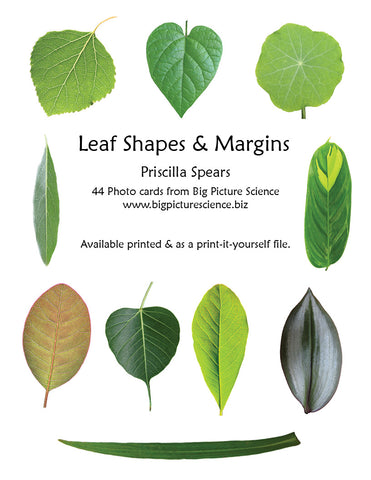
I’m continuing on my commentary about my botany materials and how to choose them, this time with emphasis on the older elementary child.
 Children in the 9-12 year-old range have different needs than the younger elementary ones, so they are not likely to find the little booklets and three-part cards of Illustrated Botany for Children attractive. They can, however, use the wall charts (summary charts) from that material to review or to check on terminology. The file for printing the wall charts by themselves is available. See http://big-picture-science.myshopify.com/collections/montessori-botany-materials/products/illustrated-botany-for-children-wall-charts-only
If you have my book, Plant Lessons: Introducing Children to Plant Form and Function, you have a number of lesson avenues to further botany studies. If your children have had the basics, then you can go deeper into flower structure, plant adaptations, fruits, and seed structure and function.
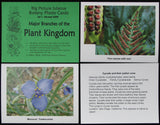 My botany photo cards set 1, Major Branches of the Plant Kingdom, is a good way to launch studies of the diversity of plants. While I would hope that you can have many of the branches of the plant kingdom represented in classroom houseplants, you are not likely to have many reproductive structures or the rarer plants available. The photos allow children to see structures and plants that you can’t otherwise provide.
If you are basing your botany studies on flowering plant families (an excellent way to structure botany), then you have lots of interesting botany yet to cover. Even if children studied a flowering plant family each month in their three earlier years of elementary, that is only 27 families out of over a hundred that might be found in temperate North America, either as natives or imported ornamentals or as food plants. The total count of angiosperm families is 413 in the last official publication. The number of families that you may experience will depend on the continent on which you reside, and on your local climate and growing conditions. The tropics have a much greater diversity than temperate areas. If children have not studied flowering plant families before, they can dig into them at upper elementary level.
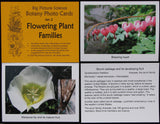 Photo card set 2, Flowering Plant Families, is an introduction to 14 flowering plant families. The photos each have text on the back to start children’s research about these lineages. The families are a sampling across the major lineages of angiosperms. The efile of my PowerPoint presentation on flowering plant families, designed first for adult botany education, is available as a download. This pdf shows 20 families, eleven of which are not in photo card set 2. The PowerPoint slides are illustrated with color photos, and the pdf is at sufficient resolution for printing. Purchasers have the right to print the slides, but only for their own classroom. The slides can serve as research starters, although the photo cards have more information, and the text is in complete sentences vs. the phrases on the slides.
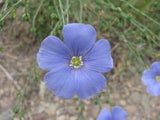 Photo card set 3, 48 Flowers for Study and Sorting, can be used with many levels of students. This set has examples of a wide variety of flower features, and includes a table to help teachers pick the right cards for a variety of lessons, from simple naming of flowers to details of their structure. While younger children will likely be sorting the pictures, upper elementary and secondary students can use the accompanying text cards to learn more about the structural details and the lineages of the plants. For example, the photo that symbolizes this set is a flower of blue flax. It is a eudicot flower with distinct petals that shows radial symmetry. The text card tells that this plant is a member of the rosid lineage of eudicots, and of the fabid lineage of rosids. Its order and family are also given.
How about structuring your botany around food plants? You could combine history of the plant’s domestication, botany of its flowers, and even include to culinary uses. The practical application of farming at middle school level is another layer of this study. Knowledge of flowering plant families can help with the planning of crop rotation and fertilizer applications.
Dig in! Enjoy the unfolding miracles of the plant kingdom that go on all around you.
I’m going to go off on a tangent before I discuss materials for botany studies with older elementary children. I’ve been researching an important tool for botany studies, a hand lens.
A hand lens (aka pocket magnifier) is very useful for botany studies. Many flowers have parts too small to see without magnification, and there are even whole flowers that are too small to see without this help. Regular magnifying glasses are usually 2-3X magnification, but what you need for botany is something in the 4X to 5X range. With that you can see the texture of stigmas and even the larger pollen grains on anthers.
In years past I have been able to purchase 5X glass hand lenses. The lens folded into a plastic case that protected it while it was being carried outdoors. When I tried to find more of these lenses, I found they were no longer available. I searched the Internet, especially Amazon, looking for a replacement and ordered several to try. Here’s what I found.
The only hand lens that had the magnification described on Amazon was the Bausch and Lomb 4X folded pocket magnifier, which cost about $14. I’m now carrying that one in my pocket as my personal lens, but that is a bit pricey for a classroom set. I found that the inexpensive lenses on Amazon were not as advertised. One that was listed as a 4X was actually a 2X. One with glass lenses came with a large scratch on the lens, and its magnification was half of the description. A “bug loupe” that was labeled 5X is actually closer to 3X, and it focuses only when held above the surface, not when resting on its clear plastic housing, which one presumes was there to contain the bug. My basic message: Let the buyer beware when it comes to inexpensive hand lenses.
To tell the magnification of a simple lens, first measure its focal length. You can do this by focusing an image of a light fixture or the scene outside a window onto plain paper. Then you measure the distance between the paper and the center of the lens. If you measured in inches, divide that measurement into 10. If you measured in centimeters, divide that measurement into 25. The result is the magnification. This means that a 5X lens should focus about 2 inches or 5 cm from the paper. A 4X lens should focus at 2.5 inches, and so on.
In the end, I decided that I will have to settle for plastic lenses, although they will scratch easier than glass. Acorn Naturalists has a small 5X lens for about $4, so you can get several for botany or other work. The lens is about an inch in diameter, which is easier for children to use than the narrower 10X lenses. Ten times is more magnification than one really needs, and the short focal length means that you cut off the light as you bend close to look.
With all these lenses, you need to hold the lens close to your eye and either bend down or bring the object up until it is in focus.
I hope this information helps you find the lenses you need for botany and other outdoor observations. If you have found a better alternative, please let me know.
I’ve heard from teachers that they are not sure what to buy or how my materials fit into their lesson sequence. Here is some information that I hope helps you with those decisions for your botany studies, as well as a link to our complete range of Montessori botany materials.
Plant Lessons: Introducing Children to Plant Form and Function. This book is the anchor for your botany studies. It gives you the lessons you need to present children with the parts of plants and what those parts do. It starts with basic lessons and continues through elementary, at least. At middle school level, it is helpful for review and to fill in gaps in plant knowledge that children may have.
For early childhood – Basics lessons on the parts of a plant, kinds of roots, and the parts of a stem, leaf, flower, fruit, and seed. Other lessons on the whole plant – deciduous and evergreen, plant life cycles, growth forms, and basic reproduction (whether the plant makes spores or seeds, or reproduces vegetatively). The five basic leaf shapes, and other leaf lessons as needed.
For first level elementary (6-9 year-olds) – All the lessons are appropriate, although it is highly unlikely that all be needed in the first three years of elementary. If children have not had the basic lessons listed under early childhood, they should receive those first. Past basic lessons, the lessons can be guided by the available plant materials. Lessons such as “Woody Stems in Winter” are best when the real plant material is available. Flower lessons can be matched to the flowers that are available. It is more important to use the lessons to further children’s knowledge of real plants than to march through all the nomenclature. If you follow the development of plants on your school grounds and in the area through the year, and supplement with cut flowers, you are likely to give your children an excellent foundation in botany.
 Illustrated Botany for Children is the botany nomenclature booklets and three-part cards for the children’s work in botany. The language level is simple enough that the young reader can manage it with a bit of help. There is a nomenclature booklet and accompanying cards for each of the lessons in the Plant Lessons book. The wall charts (summary charts) give a visual overview of each lesson and help children remember and review the content.
 48 Flower Cards for Study and Sorting (Botany photo card set 3) is useful both to use in flower lessons and in follow-up work for the children. The table that comes with the cards tells which cards are useful for a wide range of flower lessons. For example, children can sort cards that show tepals vs. petals and sepals, or they can use the cards to practice finding stamens or pistils.

 The Story of Poinsettias and The Amaryllis are children’s books for beginning elementary. These are available as files that you print. They are illustrated with color photos that show the botanical details. When these flowers are in season, the books are a great way to help children see the flowers’ important details. These books also work as a read-aloud for younger children.
 Early Spring Flowers is another file that you print to make study and research starter cards. It helps children learn the names of flowers and see those challenging inconspicuous flowers on trees like maples and alders. Older children can learn more about the flowering plant family and other plant classification.
 Plants We Eat is a set of six booklets and matching cards for kindergarten and beginning elementary. This material from InPrint for Children is a great way to make lessons on the parts of a plant more meaningful. The set includes a master for copying booklet for the children to color and label.
 Leaf Characteristics is another set from InPrint for Children that is very useful for kindergarten and beginning elementary. It helps children learn to observe the pertinent features for leaf description and is a good foundation for more advanced leaf studies.
I'll continue with recommendations for older elementary children and middle school level another day (but you can always email me with your questions). Today I feel the need to get my hands in the soil and observe my own garden plants.
Priscilla

In the Northern Hemisphere, poinsettias are now available in plant nurseries. These plants have become a part of winter holiday traditions, so it is likely that children will see them. When poinsettias appear in classrooms, you have an opportunity to introduce children to the euphorbia family and its unusual flowers.
Don’t worry about these attractive plants being poisonous. That myth has been debunked. The sap of this plant, like other members of the euphorbia family, is irritating to skin and eyes, but the plant is no great hazard in the classroom. They are no more than a mild irritant to cats and dogs. People that have an allergy to natural latex rubber could have an allergic reaction to the sap, as natural rubber comes from another member of the euphorbia family, the rubber tree, Hevea brasiliensis.
I have written a booklet for children that shows how poinsettias are grown and gives the botanical details of their bracts and flowers. It is available as a print-it-yourself file on the Big Picture Science website. I took the photos a few years ago at a small greenhouse near Conifer, Colorado. In order to trigger the plants to form flowers, they must have a dark period at night. Even a little light exposure will stop the production of buds. The greenhouse I visited was well away from the pollution of city lights.
The length of the darkness increases as days become shorter in the fall, and that is what triggers poinsettias to flower. In their native climate in Mexico and Central America, the length of darkness is only about 13 hours maximum, so flowering doesn’t require a long period of darkness. The darkness needs to be complete, however.
The brightly colored bracts are modified leaves. The flowers are in the yellow, cup-like structures in the center of the bracts. They have no petals, and children will be able to see the flowers’ details more clearly with a magnifying glass. My booklet, The Story of Poinsettias at TaTonka Farms, will help you figure out the puzzle of the flowers' structure.


 d.
d.
 To help you with your botany studies, I’ve just revised and expanded my PowerPoint slides on flowering plant families. This file is a pdf that can be printed to make letter-sized posters of 20 flowering plant families. The slides include text that describes the features of the flowers, and they show photos of family members. To round out this material, I’ve added a representative photo of 48 other families or subfamilies from all branches of the angiosperms.
  Perhaps you would like to do a Tree of Life diagram for the flowering plants. There is a good one in the book, Botanicum by Katie Scott and Kathy Willis. It is part of the Welcome to the Museum series from Big Picture Press (no relation to Big Picture Science), and it was published in 2016. The branches are correct on the diagram (pages 2 and 3), but they have just one example for each branch, and the orders are not stated. The example represents a whole order, which leaves out a lot. For example, the rose order, Rosales, is represented by a mulberry leaf. Mulberries and figs belong to family Moraceae, which is in the rose order, along with rose, elm, buckthorn, hemp, and nettle families. On the other hand, the diagram fits on two pages. It have to be much larger to be more comprehensive. All-in-all, the book is delightful and will provide lots of fun browsing. You will have to tell children that the page on fungi is a holdover from earlier definitions of botany.
 I’m not the only one that advocates structuring botany studies around flowering plant families. Thomas Elpel has written a highly successful book called Botany in a Day: The Pattern Method of Plant Identification. It is further described as “An Herbal Field Guide to Plant Families of North America.” This book is in its sixth edition. It has color drawings as well as black and white ones, and these could be useful in classrooms. I have not recommended placing this book in the elementary classroom, however, because it includes many food and medicinal uses for wild plants. I do not want to encourage children to eat wild plants or use them as medicine.
 Botany in a Day is available from Mountain Press Publishing in Missoula, Montana, which also carries Elpel’s flower family book for children, Shanleya’s Quest. This book is a great one for elementary classrooms, and I strongly recommend it.


 My botany photo cards set 1, Major Branches of the Plant Kingdom, is a good way to launch studies of the diversity of plants. While I would hope that you can have many of the branches of the plant kingdom represented in classroom houseplants, you are not likely to have many reproductive structures or the rarer plants available. The photos allow children to see structures and plants that you can’t otherwise provide.
 Photo card set 2, Flowering Plant Families, is an introduction to 14 flowering plant families. The photos each have text on the back to start children’s research about these lineages. The families are a sampling across the major lineages of angiosperms. The efile of my PowerPoint presentation on flowering plant families, designed first for adult botany education, is available as a download. This pdf shows 20 families, eleven of which are not in photo card set 2. The PowerPoint slides are illustrated with color photos, and the pdf is at sufficient resolution for printing. Purchasers have the right to print the slides, but only for their own classroom. The slides can serve as research starters, although the photo cards have more information, and the text is in complete sentences vs. the phrases on the slides.
 Photo card set 3, 48 Flowers for Study and Sorting, can be used with many levels of students. This set has examples of a wide variety of flower features, and includes a table to help teachers pick the right cards for a variety of lessons, from simple naming of flowers to details of their structure. While younger children will likely be sorting the pictures, upper elementary and secondary students can use the accompanying text cards to learn more about the structural details and the lineages of the plants. For example, the photo that symbolizes this set is a flower of blue flax. It is a eudicot flower with distinct petals that shows radial symmetry. The text card tells that this plant is a member of the rosid lineage of eudicots, and of the fabid lineage of rosids. Its order and family are also given.
 I found that the inexpensive lenses on Amazon were not as advertised. One that was listed as a 4X was actually a 2X. One with glass lenses came with a large scratch on the lens, and its magnification was half of the description. A “bug loupe” that was labeled 5X is actually closer to 3X, and it focuses only when held above the surface, not when resting on its clear plastic housing, which one presumes was there to contain the bug. My basic message: Let the buyer beware when it comes to inexpensive hand lenses.
 botany studies. It gives you the lessons you need to present children with the parts of plants and what those parts do. It starts with basic lessons and continues through elementary, at least. At middle school level, it is helpful for review and to fill in gaps in plant knowledge that children may have.
 Illustrated Botany for Children is the botany nomenclature booklets and three-part cards for the children’s work in botany. The language level is simple enough that the young reader can manage it with a bit of help. There is a nomenclature booklet and accompanying cards for each of the lessons in the Plant Lessons book. The wall charts (summary charts) give a visual overview of each lesson and help children remember and review the content.
 48 Flower Cards for Study and Sorting (Botany photo card set 3) is useful both to use in flower lessons and in follow-up work for the children. The table that comes with the cards tells which cards are useful for a wide range of flower lessons. For example, children can sort cards that show tepals vs. petals and sepals, or they can use the cards to practice finding stamens or pistils.
 The Story of Poinsettias and The Amaryllis are children’s books for beginning elementary. These are available as files that you print. They are illustrated with color photos that show the botanical details. When these flowers are in season, the books are a great way to help children see the flowers’ important details. These books also work as a read-aloud for younger children.
 Early Spring Flowers is another file that you print to make study and research starter cards. It helps children learn the names of flowers and see those challenging inconspicuous flowers on trees like maples and alders. Older children can learn more about the flowering plant family and other plant classification.
 Plants We Eat is a set of six booklets and matching cards for kindergarten and beginning elementary. This material from InPrint for Children is a great way to make lessons on the parts of a plant more meaningful. The set includes a master for copying booklet for the children to color and label.
 Leaf Characteristics is another set from InPrint for Children that is very useful for kindergarten and beginning elementary. It helps children learn to observe the pertinent features for leaf description and is a good foundation for more advanced leaf studies.