With our world in such an unusual condition now, I find the plant world a sane and stable refuge. My garden is a stress-reliever in the best of times, and it is a special help to me now. With our unusually cool and moist weather last month (Is anything usual?), the plants have done well. There was a bumper crop of cherries, and my flowers have been blooming enthusiastically since early spring.
The weeds have also done quite well. Weeds are a good source of material for botany lessons, and they are found all over, in city sidewalk cracks as well as gardens. Their adaptations make them very abundant. There are few problems with uprooting them and dissecting them. It is a good thing to learn your local weeds and know some of the lessons they offer.
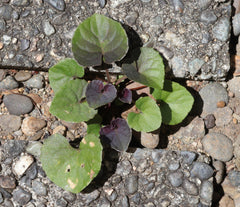
First, perhaps I’d better say what I mean by a weed. It is plant that grows where it is not wanted and displaces or damages the plants I want to grow. In my garden, some violets are weeds because they spread all over. The one below is especially weedy.
Weeding is applied leaf shape work. Learning to recognize the local weeds is a great gardening skill for children or adults. First, children have to recognize the leaves of desirable and undesirable plants. It takes time to carefully observe the garden, and it is important to have a guiding adult’s help to learn what to keep and what to uproot.
I don’t mean that children have to give the weed’s leaf shape a formal name. Many leaves can be recognized by overall appearance, and noting the leaf’s traits, such as lobes, teeth, or a particular surface texture, can help one identify the plant. Whether the leaves are opposite, alternate, or whorled around the stem is also an important trait, as is the overall size and shape of the plant.
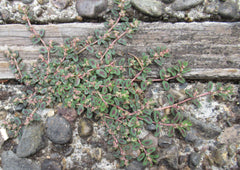
Weeds helps hone one’s observation skills. One key to being a great weed is to escape detection for as long as possible. If your children want to find weeds to study, they will have to look carefully. The spotted spurge is a champion at hiding. The dark markings on its leaves make it hard to see against the soil, and it is a prostrate plant, one that grows very flat against the soil. The overall look of this plant, its milky white sap, and its leaves are a good way to recognize it. Warn children that the sap is very irritating, which brings up another reason to know your weeds – learn the hazards that children may encounter handling them. They will need gloves if they are pulling or digging spurges.
Every spring, I pull the dozens of little maple seedlings, which I recognize by their toothed, opposite leaves. There isn’t enough room for them to grow where they have sprouted. The oak seedlings from acorns that jays and squirrels planted sprout leaves that may not look like a mature oak (see below). I want to pull the little oaks quickly before they grow deep roots and are harder to remove so I need to look for their young leaves.

Weed roots can provide interesting material for study, particularly if you can extract most of the root system. Here is a blackberry seedling that I pulled from soft soil. I was impressed by the length of its tap root. Note the transition from the stem to the roots. To make sure the weed doesn’t grow back, you have to get all the stem and the upper portion of the roots. If the top of the root remains in the soil, it can grow new shoots.

If you pull up a red-root pigweed, you’ll recognize it. It is a member of the notoriously weedy amaranth family. The plants are capable of making thousands of tiny seeds.

You can make illustrations to help children recognize weeds by photographing the plant or by placing a specimen that you have collected between two acetate sheets and scanning it or photocopying it. The acetate will help keep the scanner or copier clean.
A field guide to weeds is a great help for identifying them. There is the excellent Lone Pine Guide, Weeds of Canada and the Northern United States for those regions. In the Midwest and Rocky Mountain regions of the US, Weeds of the West, published by the University of Wyoming, is very useful. Northwest Weeds by Ronald J. Taylor is a helpful guide for that area of the US. If you are in the western US, the children’s book, Outlaw Weeds of the West by Karen M. Sackett, is a good resource for learning about weeds and their adaptations. If these do not cover your area, look for a local weed guide.
Have fun getting down in the weeds!
When we use the botany impressionistic charts to introduce children to plants, are we giving them correct information and the important ideas for them to know? That is the question I’ve been asking in this series. I’d like to call the charts “An overview of how plants work” or perhaps “Imagine how plants work." In English, the term “impressionistic” can imply that the material is hazy and unclear.
Several of these charts show people doing things to illustrate what the plant accomplishes. For instance, little men are shown anchoring roots like tent stakes. While some of this may help children understand plants, I find the real plant characteristics and real plant structures wonderful and inspiring as they are.
What do the traditional charts say about stems? One chart says that some stems are weak, and so they have to grow some structure to help them climb to reach the sunlight. This one has always driven me nuts. Nature doesn’t make weak organisms; natural selection acts against the poorly adapted. There is a better way to look at stems that climb. They have adaptations that allow them to grow upwards but don’t require them to develop a thick, rigid stem. Some kinds of vines have flexible woody stems. They are called lianas and they include grape vines and cat’s brier (Smilax). Lianas are common in tropical forests, and their stems certainly shouldn’t be called weak, as the photo shows.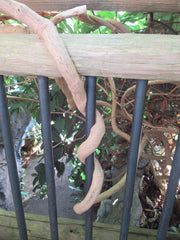
The chart on stems that climb could also show children that plants do many things with their stems beyond the usual connecting roots and leaves. Stem adaptations include food storage (kohlrabi, potato) and water storage (cacti, other succulents). Two quite different looking specialized stems help grow new plants. Corms are short, thick stems that store food and propagate the plant (gladiolus, banana). Without corms, we wouldn’t have bananas to eat because the domestic bananas are seedless. Runners are greatly elongated stems that enable the plant spread its offspring across the ground (strawberries). Thorns are short, pointed stems that discourage herbivores (hawthorn). Climbing roots, twining petioles, twining stems, and tendrils represent many ways that plants can fulfill their need to reach the sunlight.
The traditional botany charts include a depiction of photosynthesis in the leaf. Please make sure that you are giving children accurate ideas about photosynthesis. Hint: If your “chemical factory in the leaf” chart shows carbon monoxide being formed, it is giving false information. Why should we ask children to imagine false ideas when we can give them steps in the real process? The process of photosynthesis has quite a lot of details, and it must be greatly simplified for children, but if we are going to give them an idea of what goes on, it should be a valid framework to which they can add details later.
The “chemical factory in the leaf” should show that sunlight is used to break apart water molecules. It is the chlorophyll molecules that capture the Sun’s energy. The sunshine-requiring “light reactions” produce hydrogen ions and oxygen molecules. (They also produce high energy electrons and energy-rich molecules (ATP), but that is more chemistry than beginners need.) The hydrogen is joined to a carrier molecule, moved to a different area, and combined with small, carbon-containing molecules that have had a carbon dioxide attached. A series of reactions produces sugar. Most charts simply show the hydrogen and carbon dioxide entering a structure of some sort and sugar coming out. That is likely to be enough information for the beginner.
Check the depiction of carbon dioxide on your charts. It is a linear molecule. There is a carbon in the center with an oxygen on either side. The oxygens are directly opposite one another – 180 degrees apart. It isn’t like water, which is v-shaped.
I’ve seen charts that show the sugars from photosynthesis being combined into starch, which does happen in plants. A little bit of starch is made in the chloroplast, and it acts as fuel during the nighttime. Starch, however, is NOT transported through the plant’s phloem. Starch is too big to go into solution. The transportable product of photosynthesis is the sugar sucrose (table sugar). The sucrose travels to leaves, stems, and roots, where it is converted to starch, which stores the chemical energy until it is needed. Sucrose is made from two 6-carbon sugars, so there is some processing of the product of photosynthesis before it is transported.
And then there is the chart that shows leaves worshiping the Sun. Do we worship the food on our plates? No, although a healthy serving of appreciation for the food that sustains us is a good thing. The real leaf story is so much more interesting. We can help children imagine how a plant positions its leaves and appreciate beautiful leaf arrangements. As for the leaves, they are arranging themselves to get maximum sun but minimum damage. Sunlight comes with heat, and leaves take action to avoid getting cooked. A leaf in the shade may be oriented horizontally. In full sunlight, the same species may turn its leaves on edge to protect them from heat. In deserts, many plants orient their leaves to catch less of the Sun’s hot rays.
I’ve always found much in nature that is inspiring and remarkable, and that’s without turning plants into people. When we learn about a natural phenomenon, there always seems to be more of the story. This alone can be inspiring to children. We can let them know that there is much more to the story of plants and how they work than we show on the botany charts.
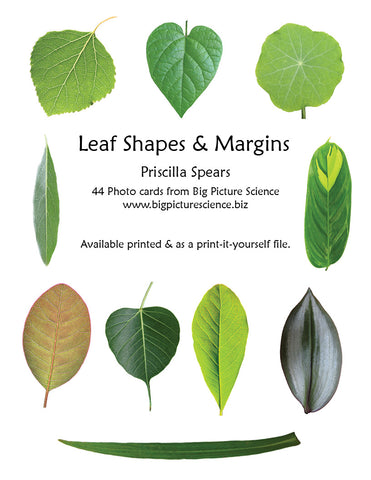
With summer nearing the end and fall coming fast, do your thoughts turn to leaves? If so, I’ve got a new card set for you -- Leaf Shapes and Margins. I’ve been collecting photos of leaves for many years. I selected 44 species that show a variety of characteristics and turned the images into cards for the classroom. Each card has a single leaf, sans background, along with its common and scientific name. Here's the card for the aspen leaf. It is half a letter-sized page (5.5 X 8.5 inches) in real life. You can see the details of its venation and the structure of its margin.

While I designed this set for older elementary children to use in leaf shape studies, it can be used by any age for appreciation of the beauty and variety of leaves. It takes math and botany to describe leaf shapes according to the Manual of Leaf Architecture by Beth Ellis, et. al., a highly respected professional botany reference. First one must measure the length of the leaf blade, and then divide it into five equal parts. Next one must find the widest part of the leaf blade and see if it falls within the middle fifth, in the basal two-fifths, or in the two-fifths nearest the apex. That determines elliptic, ovate, and obovate shapes respectively. An oblong leaf has about the same width through the middle one-third of the leaf blade. A linear leaf is at least ten times longer than it is wide. Those are the five major leaf shapes. This more precise system of determining leaf shapes replaces an overwhelming number of loosely defined traditional terms.
Warning – to prevent brain strain, do NOT measure in inches. Use centimeters, and you will appreciate why scientists (and most of the world) use the metric system.
For more math and botany, one can measure the angle of the apex and base of a leaf and decide if these angles are acute, obtuse, or reflex. For the base, there is one more situation, a circular base. The shape of the apex and base are also part of the leaf description. There’s more about this in my book, Plant Lessons: Introducing Children to Plant Form and Function.
Margins can have teeth, lobes, both structures, or neither. There are leaves that show all these situations in the set. The leaves include common trees, such as oaks, maple, and elm, as well as houseplants and weeds. Crabgrass comes in handy when you need a linear leaf. No one minds if you pull it up. The bo tree shows how a drip tip looks, not something you will find in your neighborhood unless you live in a tropical area.
The background information that comes with this new set includes a few sentences about each of the plants whose leaves are shown, a procedure for determining leaf shapes, and a table that gives the description of the leaves so you can check your results.
More than anything, I hope this card set inspires all ages to look more closely at leaves and appreciate the wonderful structures of these food factories for life on Earth.
Happy Fall Botany!