News
What goes on a timeline of life? November 05 2020, 5 Comments
Suggestions for evaluating a timeline of life.Budding botany fun September 24 2020, 0 Comments
Many times, children see plants presented as static objects rather than dynamic, interesting living things. I have a new card set that can help you bring more liveliness and fun to botany. It is called “What Flower Is Growing Here?” The set has close-up photos of buds and on a second card, the flowers that unfold from them. Children look at a bud and see if they can match it to the flower in bloom. There are 16 different species of plants featured, and their study can stimulate bud observations in both spring and fall. You can see the set here. https://big-picture-science.myshopify.com/collections/montessori-botany-materials/products/what-flower-is-growing-here .


There is a sentence or two on the flower card that helps children understand more about the flower. For more advanced children, there is a text card for each plant that gives its classification, more details of its development, and its origin.
Annuals and herbaceous perennials grow most rapidly in spring and summer. They produce their buds and blooms from spring to late summer. Most of them have finished their activities in autumn. Herbaceous plants that are pictured in the “What Flower Is Growing Here?” set include petunias, pansies, poppies, and peonies. Zinnias, hollyhocks, nasturtiums, lilies, and columbines, along with daffodils, daylilies, and the bearded iris, round out the spring and summer bloomers that die back in winter.
In autumn, there are structures to observe in another group of plants, the shrubs and trees. Several woody plants form conspicuous flower buds by autumn and hold them over the winter before they bloom in spring. All of them form leaf buds, and many form flower buds that are hidden in the leaf buds. The woody plants in “What Flower Is Growing Here?” are the rhododendron, flowering dogwood, and star magnolia. All three of these form their flower buds in the late summer or early autumn. They have flower buds that children can easily see all winter long. Other woody plants that form visible flower buds in autumn include alders (shown below), birches, forsythias, and the silktassel (Garrya).

Considering these two categories of plants, there is some flower bud to be seen almost year round. After children have worked with the “What Flower is Growing Here?” cards, they are primed to find buds on nearby plants. They can even look at weeds with a hand lens and may be able to find tiny flower buds there. Following buds through their development is an important activity that helps children see plants as alive and dynamic.
When children see the buds during the winter, they will be primed to observe the big changes that come in spring. If they keep a watch on annuals and perennials in the spring, they may spot the buds well before bloom time. It is exciting and amazing to see what a large flower emerges from some small buds.
The same sort of excitement can come in spring when the leaf buds start to open. Woody plants form their leaf buds in the previous summer or autumn, and most are covered by bud scales. Giving children an opportunity to observe next year’s leaf buds will prepare them to appreciate the swelling bud scales and leaf emergence in the spring.
Enjoy watching your plants bring forth their buds and flowers.
Sorting Branches on the Tree of Life August 07 2020, 1 Comment
Studies of the diversity of life are a pillar of life science at elementary level. In the past, Montessori classrooms used charts that show Linnaean classification – Kingdom, Phylum, Class, etc. Those charts are no longer very useful except in studies of the history of science. Instead, children need an introduction to the Tree of Life, which they can get via a branching diagram aka family tree, evolutionary tree, phylogenetic diagram, or phylogeny. If you need a Tree of Life diagram, you can download one for free at my website.
In early childhood, children sort pictures under labels, beginning with living vs. nonliving, animal vs. plant, and invertebrate vs. vertebrate, for example. Later, they sort pictures under more categories such as classes of vertebrates or phyla of invertebrates. The activity in my new material, Sorting Branches on the Tree of Life, will look somewhat familiar to children, but it has enough differences to make it challenging and interesting.
As Montessori classrooms adapt to the changing world of academic knowledge, one of the first things will be to help children learn the main branches on the Tree of Life. They need an introduction to the Tree of Life to get an overview, and then they are ready to start studying the main branches. Note that I use the terms “clade,” “lineage,” and “branch” to mean more or less the same thing – an ancestor and all of its descendants.
A challenge of Tree of Life classification is that the big branches have little branches, and the branches are not ranked (aren’t a phylum, class, etc). One simply has to know that the vertebrates are a branch of the chordates, for example. It really isn’t as hard as it sounds. Sorting Branches on the Tree of Life will help children and adults learn the main branches as they sort photos of organisms under a set of heading labels. When children have completed the diagrams, they will be able to see that the organisms belong to a number of clades. They will also be more prepared to use phylogenies (branching diagrams) that show the main branches. Older ones may even want to try their hand at drawing a phylogeny based on a diagram they have completed.
Sorting Branches on the Tree of Life covers the vertebrates and the plants. It has a series of lessons, each of which builds on the last to help children learn the clades (branches, lineages). The lessons use images of extant animals (with one exception) and plants, but they tie into some of the history of the clades as well. One really can’t teach about the diversity of life without giving information about the origin of the branches of life.
I’ll start with descriptions of the lessons for the vertebrates in this article and leave the plants for another day. The first lesson shows the earliest branching of the vertebrates, which produced the jawless fish and the vertebrates with jaws. The latter clade, called the gnathostomes, has two branches, the cartilaginous fishes and the bony vertebrates. I have called the second branch the bony vertebrates instead of the bony fishes because it holds more than just fish. It is actually our branch as well.
The bony vertebrates have two branches, the ray-finned fish and the lobe-fins. The latter includes the coelacanth and the lungfish, as well as the tetrapods, the animals with four limbs. I used a picture of a lion to represent the tetrapods so that children could see that ALL the tetrapods belong to that lineage, not just the amphibian-like, first ones to evolve.

The second lesson shows the branches of the tetrapods, and its diagram shows that birds are a branch of the reptiles.

Reptiles, birds, mammals, and eutherian mammals each have another lesson with a diagram. The reptile and mammal lessons come after children have had the tetrapod lesson. The reptile lesson shows that this branch of life divides into the lepidosaurs (“scaly lizards”) and the archosaurs (“ruling lizards”). For the latter, the branches are the crocodilians (crocodiles, alligators, and relatives) and the dinosaurs. The pictures under the dinosaur label are a non-avian dinosaur and an avian dinosaur – a chicken. Yes, the birds are really dinosaurs, and they should be placed under the archosaur label.
Don’t panic at the idea of birds being a branch of the reptiles. We can still teach about those two branches of life separately. The traditional reptile lessons usually give the characteristics of the squamate reptiles – lizards and snakes – or of turtles, which are a world of their own, a sister branch to the archosaurs. Lessons can emphasize the traits that birds and crocodilians share. Studies of birds can note their reptile-like traits such as scaly skin on their legs.
The mammal diagram shows the first two branches as the monotremes and the therians. This omits a lot of mammal history, but the point of these lessons is not the whole history of the organisms. It is about the branches of the currently living ones. The therians are the marsupials and the eutherian mammals, aka placental animals. When you have finished the lesson on the eutherian mammals, children can go back through and make a list of their own branches of life.
I produced this material this spring, and children in a Montessori classroom got to see a prototype just before the schools closed because of the pandemic. The teacher reported that they were very interested in the material, partly because it doesn’t look like all their other materials. By elementary age, children are ready for variety and challenge. Sorting Branches on the Tree of Life supplies both.
I am happy to answer questions you may have about this material. I supply it as a digital download, a file that you can print for yourself. See https://big-picture-science.myshopify.com/collections/biology/products/sorting-branches-on-the-tree-of-life-vertebrates-and-plants.Learning from weeds July 11 2020, 0 Comments
With our world in such an unusual condition now, I find the plant world a sane and stable refuge. My garden is a stress-reliever in the best of times, and it is a special help to me now. With our unusually cool and moist weather last month (Is anything usual?), the plants have done well. There was a bumper crop of cherries, and my flowers have been blooming enthusiastically since early spring.
The weeds have also done quite well. Weeds are a good source of material for botany lessons, and they are found all over, in city sidewalk cracks as well as gardens. Their adaptations make them very abundant. There are few problems with uprooting them and dissecting them. It is a good thing to learn your local weeds and know some of the lessons they offer.
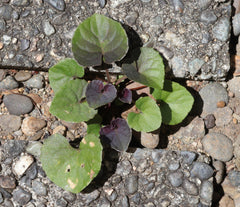
First, perhaps I’d better say what I mean by a weed. It is plant that grows where it is not wanted and displaces or damages the plants I want to grow. In my garden, some violets are weeds because they spread all over. The one below is especially weedy.
Weeding is applied leaf shape work. Learning to recognize the local weeds is a great gardening skill for children or adults. First, children have to recognize the leaves of desirable and undesirable plants. It takes time to carefully observe the garden, and it is important to have a guiding adult’s help to learn what to keep and what to uproot.
I don’t mean that children have to give the weed’s leaf shape a formal name. Many leaves can be recognized by overall appearance, and noting the leaf’s traits, such as lobes, teeth, or a particular surface texture, can help one identify the plant. Whether the leaves are opposite, alternate, or whorled around the stem is also an important trait, as is the overall size and shape of the plant.
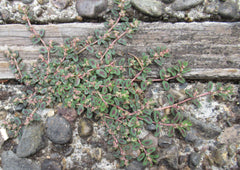
Weeds helps hone one’s observation skills. One key to being a great weed is to escape detection for as long as possible. If your children want to find weeds to study, they will have to look carefully. The spotted spurge is a champion at hiding. The dark markings on its leaves make it hard to see against the soil, and it is a prostrate plant, one that grows very flat against the soil. The overall look of this plant, its milky white sap, and its leaves are a good way to recognize it. Warn children that the sap is very irritating, which brings up another reason to know your weeds – learn the hazards that children may encounter handling them. They will need gloves if they are pulling or digging spurges.
Every spring, I pull the dozens of little maple seedlings, which I recognize by their toothed, opposite leaves. There isn’t enough room for them to grow where they have sprouted. The oak seedlings from acorns that jays and squirrels planted sprout leaves that may not look like a mature oak (see below). I want to pull the little oaks quickly before they grow deep roots and are harder to remove so I need to look for their young leaves.

Weed roots can provide interesting material for study, particularly if you can extract most of the root system. Here is a blackberry seedling that I pulled from soft soil. I was impressed by the length of its tap root. Note the transition from the stem to the roots. To make sure the weed doesn’t grow back, you have to get all the stem and the upper portion of the roots. If the top of the root remains in the soil, it can grow new shoots.

If you pull up a red-root pigweed, you’ll recognize it. It is a member of the notoriously weedy amaranth family. The plants are capable of making thousands of tiny seeds.

You can make illustrations to help children recognize weeds by photographing the plant or by placing a specimen that you have collected between two acetate sheets and scanning it or photocopying it. The acetate will help keep the scanner or copier clean.
A field guide to weeds is a great help for identifying them. There is the excellent Lone Pine Guide, Weeds of Canada and the Northern United States for those regions. In the Midwest and Rocky Mountain regions of the US, Weeds of the West, published by the University of Wyoming, is very useful. Northwest Weeds by Ronald J. Taylor is a helpful guide for that area of the US. If you are in the western US, the children’s book, Outlaw Weeds of the West by Karen M. Sackett, is a good resource for learning about weeds and their adaptations. If these do not cover your area, look for a local weed guide.
Have fun getting down in the weeds!
How does hand sanitizer work? A demonstration for children June 07 2020, 1 Comment
Children have had a lot of experience with hand sanitizer lately, and they may wonder how something so “watery” can do much against microorganisms on their skin. Here is a demonstration to help make the action of hand sanitizer more understandable.
The action of plain soap and water does the best job of removing microorganisms from our hands. When it is not available, hand sanitizer is a reasonable alternative. Both of them act by damaging microorganisms. Soap and water suspend the microbes and wash them away as well.
Microorganisms have two types of molecular components on their outside that keep them intact and able to infect, proteins and lipids (fats), particularly the lipids in membranes. There are millions of kinds of proteins, each with its own properties. One thing important to them all, however, is having a certain shape. If the shape of the protein is changed, it won’t function as it should. The scientific term for changing a protein’s shape is denaturing it.
When we want to “kill” a virus, one thing to do is disrupt the proteins on the outside of the viral particle (virion). Those proteins must function for it to enter a new cell and start to replicate. I said “kill,” but viruses aren’t alive in the same way as cells. The better term for keeping virus from replicating is “inactivate.” If we can change the outer proteins of the virion, we can inactive it. If the problem microbe is a bacterium or a virus with an envelope, then damaging its membrane can also prevent it from being infectious.
Here is an experiment that helps children see that proteins can be changed. The protein for this activity is egg white. It isn’t really one protein; it is a mixture of several of them. The egg white looks transparent in an uncooked egg. You can think of the proteins as tiny balls of yarn all wound up in a precise way. The properties of the amino acids that make up egg white proteins cause them to fold into a tight ball. The amino acids with charges turn to the outside because they are good at interacting with water. The ones without charges are not attracted by water, and they stay together on the inside of the protein ball. A protein in a membrane always has uncharged amino acids that interact well with lipids.
First, let children see what happens when the egg white is heated. It is more dramatic if you crack an egg into an under-heated skillet and watch as you turn up the heat. At some point, the heat energy causes the amino acid chains of the proteins to vibrate so much that they come unraveled. The loose chains then react with each other and form a white solid.
Make sure children know that what follows is a science experiment, and they should NOT taste or consume any of the egg white they use. Keep the experiment egg white separate from eggs you intend to eat.
To do the hand sanitizer test, you will need three small plastic cups or glasses. It is best to use small amounts because there is less waste and easier clean-up after the activity. Break an egg into a small shallow bowl and spoon out samples of the runny white part. Place about a teaspoon (5 ml) of egg white in each cup. You can use the remaining egg for food, provided you have kept it clean; remove it from the science lab area.
You can microwave one of your small cups of egg white about 5 seconds, and it will turn to an opaque white solid. Heat serves as a positive control, which shows that our test system works. We know that heat should solidify the egg yolk.
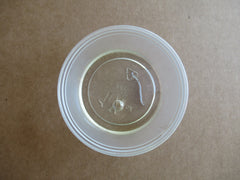
Label the heated cup (shown above), and move the next one.It will be the negative control. It has egg white with nothing added, so it should show no changes. (shown below)
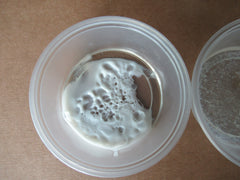
Add 1-2 teaspoons of hand sanitizer to the third cup. If you want, you can use rubbing alcohol (70-99% isopropyl alcohol) instead or use an additional cup with egg white to test that alcohol as well. Tilt the cup to mix the hand sanitizer with the egg white. You should see the egg white quickly turn to an opaque white solid, just as if you had heated it.

What the alcohol in the hand sanitizer did was unravel the protein molecules. The amino acid side groups that were tucked inside the protein interact with the alcohol, which turns the protein inside out and breaks attractions that held the amino acid chain tightly folded. The long chains unwind and react with each other, just like they did when the proteins were heated. If the hand sanitizer can do this to proteins in bacterial membrane or viral envelope, the microbe will not be able to infect.
I tried a lower concentration of alcohol (about 47% vs. 62% in my hand sanitizer), and it produced white specks, but it didn’t turn all of the egg white opaque. There is a reason why hand sanitizer is required to have a minimum of 60% alcohol.
Stay safe, stay healthy, and have fun exploring the world around you,
Priscilla
Imagining a virus April 27 2020, 1 Comment
We are all making major adjustments as the novel coronavirus runs around the globe. I would like to have some magic to work on the problems of teaching remotely and sudden, forced homeschooling, but the only magic I know is the wonder of nature. I’ll give you some lesson ideas to help deliver wonder to children.
The present situation calls for explorations of viruses. These tiny entities are hard to understand without some good illustrations and models. You can start with a math lesson about their size. You will need a meter stick or other way to measure a meter, and a ruler or a meter stick that is marked in millimeters. Children can observe a meter and then a millimeter (mm). Note that a millimeter is one-thousandth of a meter. One millimeter is about the diameter of the head of a pin. The smallest known vertebrate, a frog named Paedophryne amanuensis, is about 8 mm long.
Next, children and adults have to use their imaginations. The smallest thing that we can see using only our eyes is about a tenth of a millimeter. We need to go much smaller than that. The unit that is one-thousandth of a millimeter is a micrometer (officially spelled “micrometre” outside the US and abbreviated μm). The micrometer is useful for measuring bacteria, organelles in eukaryotic cells, and the shorter wavelengths of infrared radiation. Most animal cells range from 10-30 μm across.
While a few of the giant viruses are in the 0.5 micrometer range, most viruses are much smaller. (Yes, there are such things as giant viruses, but they don’t infect humans.) To measure the diameter of most viruses, we need to go a thousand times smaller than a micrometer, down to the nanometer (abbreviated nm). The nanometer is one-thousandth of a micrometer. The wavelengths of visible light range from about 400-700 nm. The DNA helix is about 2 nm across, and common viruses range from 20-300 nm in diameter.
The highest magnification in a light microscope is 1000X. We can see bacteria and the giant viruses with this magnification, but to see anything smaller, we must use an electron microscope. For detailed pictures of a virion (a single particle of virus) like the one below, biologists use computer illustrations based on the molecules that make up the particle.
This website, https://learn.genetics.utah.edu/content/cells/scale/, from the University of Utah has a great illustration of viral size vs. other objects. There is a slider underneath the illustration that allows one to see at increasing magnification down to the size of the carbon atom. The journey helps put viruses into perspective.

My booklet, “What is a virus?” has information on the structure of viruses, their replication, and how biologists image them. See https://big-picture-science.myshopify.com/collections/frontpage/products/what-is-a-virus. (If you have the second edition of my book, Kingdoms of Life Connected, you already have most of this booklet.) This booklet includes a pattern for making a scale model of an adenovirus. To design this model, I took the measurements of the virion in nanometers and scaled them up to millimeters. I used two-ply baby yarn for the viral DNA. The model is 1,000,000 times larger than the real viral particle; it is about the size of a baseball.
If you want to make a coronavirus model, you can use a roughly spherical object that is about 10 cm in diameter and add 1 cm spikes on the outside. This gives you a virus model that is 120 mm across. The viral particle itself is 120 nm across. If you want to show the RNA inside, your model needs to be transparent or have a flap that opens to show what’s inside. A single strand from baby yarn is the right diameter to model the virus's RNA at this scale.
Try calculating how tall you would be if you were a million times larger. If you want to do it the easy way, use a unit converter on the Internet. Enter your height and then add six zeros. To give you an idea of the answer, if an average height woman were a million times taller, she would be about 1000 miles or 1600 kilometers tall!
You may wonder how something so small as a virus can change our world in such major ways. There are many people trying to figure that out right now.
Spring cleaning in your biology closet March 04 2020, 0 Comments
It’s that time of year when the urge to put things in order can strike. You may have a closet with a lot of biology materials that you want to evaluate. Here are my suggestions for things to throw out. You may not want to discard the whole material just because it has flawed content provided it is feasible to fix the problems.
In the animal kingdom materials, if you find anything that has the phylum Coelenterata, please remove that name or cover it. Biologists haven’t used it for more than 30 years. That phylum was split into two others when biologists discovered that it held two unrelated groups. The two lineages are called phylum Cnidaria (anemones, corals, and jellyfish) and phylum Ctenophora (comb jellies). It is likely that you can cover over “Coelenterata” and add the label “Cnidaria.” Just make sure that you don’t have comb jellies in with your cnidarians.
Another no-no for the animal kingdom is showing protozoa along with the animals. This goes back to the two-kingdom idea of classification, and biologists and biology textbooks haven’t grouped protozoans with animals in more than 40 years.
If you find a chart that is labeled “Non-Chordates,” change the title to “Invertebrates.” Maybe “non-Chordate” was useful in the past, but biologists use “invertebrate” far more often. I searched books on Amazon.com using “non-chordates,” and I got six titles, all published outside the US. I searched “invertebrates,” and got over 6000 titles. A non-chordate chart isn’t likely to show current information, so it is time to recycle it or at least recycle the images and add new text.
The relationships between the phyla of animals solidified about 15 years ago. In biology, classification has morphed into systematics, which all about relationships and shared common ancestry. The details of this would take several blogs so I will simply say that the arthropods are related to the nematodes, and the mollusks are related to the annelids. Arthropods were once grouped with annelids, but that is no longer considered valid. Can you add something to your animal kingdom chart that shows which phyla are closely related? See my book, Kingdoms of Life Connected, for help if your animal kingdom chart needs a redo. https://big-picture-science.myshopify.com/collections/frontpage/products/kingdoms-of-life-connected-second-edition. It is also available as an ebook (pdf).
Dig back into the cobwebs in the botany section of your closet. If your chart of the plant has club mosses separated from the fern clade – whisk ferns, horsetails, and ferns – you have a good representation of life’s diversity. The chart from InPrint for Children is a good example. https://big-picture-science.myshopify.com/collections/montessori-botany-materials/products/plant-kingdom-chart . Another mark of a current material – it should use the term “eudicots” instead of “dicots.” If your chart has phylum names, it is quite possible that many of the names are obsolete. Many botanists no longer use phyla or division names. Instead, they use lineage names, and sometimes a common name is all you need. I have a graduate level botany textbook that uses no phylum/division names.

If your plant kingdom chart has fungi or bacteria on it, the time has come to do some serious pruning. Those two have to go to their own charts. If the image of a fungus appears on a plant kingdom chart, that’s what children will remember even if you say that it doesn’t belong there. The fungus kingdom is a sister to the animal kingdom. In nature, fungi and plants are partners, but on classification charts, they shouldn’t hang around together.
If you have a Five Kingdoms chart, file it under the history of biology. It should NOT be the first thing children see as they study the diversity of life. The Tree of Life is the place to start.
How about your timeline of life? This is a difficult material to do well, and there are many bad attempts out there. Does your timeline show several red lines coming together (converging)? That’s the traditional style, but lineages do not converge (fuse together); they diverge (split apart). Maybe you could salvage the images and redo the timeline without the misleading lines. Check the dates for the fossils because there are several in the wrong place on the older timelines.
Does your timeline of life have photos of extant animals or plants in prehistoric times? This gives a very wrong impression. I’ve seen a timeline that had “First marsupial” and a picture of a kangaroo. This is just like saying “First eutherian (placental) mammal” and showing a picture of a horse. Both the kangaroo and the horse evolved within the last few million years. They are both adapted to live on grasslands and open shrub lands, where resources are spread out, and there is little cover from predators. Therefore both are good at moving quickly over long distances. Neither one of them belongs in the Mesozoic Era on a timeline of life. Mesozoic mammals were much smaller and less specialized.
Does your timeline have the five major extinctions? And does it have ice ages in the right places? The older charts used ice to symbolize all extinctions, although that wasn’t the cause in most of them. The five major extinctions come at the end of the Ordovician, Devonian, Permian, Triassic, and Cretaceous Periods. They are such important shapers of life that they are essential to a good timeline.
If all this correcting sounds like too much to do, remember that you are doing it for the children. They need current information and a foundation that they can use in their future studies. There is no point in giving them science “information” that they will never see outside a Montessori classroom.
An imaginary look at the animal kingdom nesting boxes January 14 2020, 2 Comments
In my last post, I took readers on an imaginary tour of nesting boxes for the plant kingdom. These materials are traditionally called Chinese boxes, but I prefer to use “nesting boxes.” Children explore the structure and major lineages of a kingdom of life with this material. Nesting boxes work well for showing the lineages of the animal kingdom provided the content reflects current knowledge.
Here’s an imaginary tour of nesting boxes for the animal kingdom as it is defined today. I believe firmly that we should be giving children terms that they will see in their further studies, not terms that are historical and that do not appear in modern textbooks.
To start our tour, picture a large red box labeled “Animal Kingdom.” We remove the lid, and inside there is a small box that is labeled “Phylum Porifera, the sponges.” This group was once called the Parazoa, but this term has fallen out of favor, and I recommend these animals be called the sponges. Once thought to be several separate lineages, they are now placed on one lineage, Porifera (“the pore-bearers”).
Along with the little Porifera box, there is a much larger box that takes up most of the animal kingdom box. It is labeled “Eumetazoa, the true animals.” We lift the lid, and inside there are two small boxes labeled “Phylum Ctenophora, the comb jellies” and “Phylum Cnidaria, the stingers.” A large box labeled “Bilateria” takes up most of the remaining space, and it holds the animals with bilateral symmetry.
Cnidarians include the sea anemones, corals, and jellyfish. The comb jellies include sea gooseberries and sea walnuts. These two phyla were previously placed in a single phylum. That phylum, Coelenterata, is obsolete and should not appear in current animal kingdom classification studies. Our small red boxes are labeled “Phylum Cnidaria, the stingers,” and “Phylum Ctenophora, the comb-bearers,” and “Coelenterata” is not here at all.
The big box labeled “Bilateria, animals with bilateral symmetry” contains two boxes, which are labeled Protostomes (“mouth first”) and Deuterostomes (“mouth second”). These names reflect a difference in the development of the fertilized egg in these two lineages. The deuterostome box takes up about 1/3 of the space. We look inside it, and we find two boxes, one labeled “Phylum Echinodermata, the spiny skins,” and the other “Phylum Chordata, the corded ones.” The echinoderm box has the sea urchins, sea stars, and sea cucumbers inside. The chordate box has its three subphyla inside, the lancelets, the tunicates, and the vertebrates. Note that chordates are not the same as vertebrates! I’ve seen them mistakenly equated in Montessori materials. (If you find the term “non-chordate” in your materials, it would be best to change it to “invertebrate.”)
The protostome box has two boxes inside, one labeled “Spiralia” or “Lophotrochozoa” and one labeled “Ecdysozoa.” The Spiralia box has the rotifers, the flatworms, the mollusks, and the annelids (segmented worms). This box also has the name Lophotrochozoa although some biologists use this cumbersome term for only a part of the Spiralia. The term Spiralia could change so check again in a few years to see the current story. The Spiralia are named for the pattern of cells in the early embryos of most species.
“Lophotrochozoa” is still used for the Spiralia lineage in many college textbooks, but this could to change by the time elementary children reach college age. I have adopted “Spiralia” because of biologists’ support for it, and it is easier to spell and say. My book, Kingdoms of Life Connected, still has “Lophotrochozoa” because when I reprinted it last year, the term “Spiralia” was not yet shown in Wikipedia (usually a good source for the latest phylogeny). I hope biologists have settled on the name by the time I print the book again.
The ecdysozoa are the molting animals. They shed their whole outer covering at once. This is the most successful animal lineage in terms of numbers of species and numbers of individuals. The Phylum Arthropoda, the jointed feet, and the Phylum Nematoda, the roundworms, are the two main phyla in this box. Tardigrades and velvet worms could also go here if space allows and if you want to get that level of detail.
If any of your animal kingdom materials include “protozoa,” please remove them and study them with the eukaryotic supergroups (protists). They do not belong in the animal kingdom. If your nesting boxes for animals have protozoa, the best time to change this was about 40 years ago. The second best time is now.
I’ve presented a basic look at the animal kingdom here. If you would like further information on the animal kingdom or the lineages I gave in this article, please see my book, Kingdoms of Life Connected. https://big-picture-science.myshopify.com/collections/biology/products/kingdoms-of-life-connected-second-edition (printed) and https://big-picture-science.myshopify.com/collections/biology/products/kingdoms-of-life-connected-ebook-1 (pdf).

If you want to evaluate an animal kingdom chart, look for the groupings I gave for the nesting boxes. The nematodes should be grouped with the arthropods. The echinoderms should be grouped with the chordates. This is because biologists group organisms according to their shared ancestors, not just how they look. The chart from InPrint for Children places related phyla next to each other. See https://big-picture-science.myshopify.com/collections/biology/products/animal-kingdom-chart.

My photo card set for the animal kingdom - https://big-picture-science.myshopify.com/collections/biology/products/zoology-photo-cards-set-1-major-phyla-of-the-animal-kingdom – gives you high quality images of representative animals across the kingdom. They could be used in or alongside a nesting box material.

Happy explorations of the animal kingdom,
Priscilla
PS. I am putting my reply here to two comments below. I'm sorry I don't have pictures of this imaginary material for you, Gail. I, too, am a visual learner. I think Cindy's idea of referring to the animal kingdom diagram from my Tree of Life chart might help. Yes, the lids on the boxes would be like a node on the evolutionary tree (phylogeny). The reason that there isn't a box for the Radiata is that they don't seem to share a common ancestor other than the one for all animals. If they did share a more recent ancestor, they might still be in Coelenterata. They have a similar organization, although the ctenophores are described as biradially symmetrical. They have a combination of radial and bilateral symmetry. The cnidarians are genuinely radially symmetrical. These two phyla came from separate experiments by early animal life. This is different than the the two phyla shown in the Ecdysozoa. They shared a common ancestor - at least there evidence for this in their genomes.
Thank you for sending your questions and comments. Please feel free to ask further questions.
An imaginary tour of nesting boxes for the plant kingdom December 13 2019, 0 Comments
The nesting boxes for the plant kingdom are a classic Montessori material. (They are usually called Chinese boxes, but I don’t like to use that term. They certainly didn’t come from China.) Like many other materials that were created many years ago, this one needs a make-over or at least a reality check to see if it reflects what children will see in their later studies.
Paraphrasing a Chinese proverb, if your nesting/Chinese boxes are based on a two-kingdom classification, and they contain the bacteria and fungi, the best time to change them was before 1980. The second best time is now.
The point of elementary studies isn’t to teach children names and ideas that they are not likely to see again. Maria Montessori said that children who complete her elementary program would have acquired knowledge equal to a high school student of her day. She wasn’t trying to create a separate set of biology terms; she was giving children the mainstream academic knowledge of her day. Continuing to use the terminology and concepts of the traditional lessons without checking to see current academic view leads to problems. Children may have to discard their Montessori lessons and go back to the beginning to learn contemporary biology. “Unlearning” is very hard for people. They tend to cling to the first way they learned something, and they must accept that their version is wrong before they can accept another view.
If there were nesting boxes that reflect the current academic view of the plant kingdom, how would they look? Here are my ideas.
Picture a large, green box that is labeled “Plant Kingdom.” It could have other labels as well as that main one. Possibilities are the more formal Latin Kingdom Plantae, or the more descriptive one, Embryophytes. The latter is the informal scientific name for land plants.
We take the lid off this box and find a small box labeled “Bryophytes, the nonvascular plants” and a much larger one labeled “Tracheophytes, the vascular plants.” Inside the bryophyte box, there are three smaller boxes labeled “hornworts”, “liverworts”, and “mosses.” Should there be a label for the division/phylum of these boxes? There doesn’t have to be. I have an advanced botany textbook that doesn’t use a Linnaean rank name for these branches of plant life. If you want to add the division/phylum names, see Wikipedia. It is generally quite good for plant classification.

The larger Tracheophyte box contains two boxes, a small one labeled “lycophytes” and a much larger one labeled “euphyllophytes, the true-leaf plants.” The lycophyte box has three small boxes inside, the club mosses, spike mosses, and quillworts. Alternatively, the lycophyte box could list these three lineages on the lid and not separate them. They are best described as orders of the lycophytes.

The euphyllophyte box has two boxes inside, a smaller one labeled “fern clade, the monilophytes” and a larger one labeled “Spermatophytes, the seed plants.” The fern clade box has several smaller boxes. They are labeled: “ophioglossids – whiskferns, alder’s tongue ferns, and grape ferns”; “equisetums – the horsetails and scouring rushes”; and “leptosporangiate ferns or polypod ferns – the true ferns.” If your school is in a tropical climate, you may need to add a fourth box for the marattid ferns. They are huge plants that grow only in the tropics.

The spermatophyte box holds two boxes, the angiosperms or flowering plants, and the gymnosperms, the naked seed plants. The gymnosperm box holds four boxes – the cycads, the ginkgo, the conifers, and the gnetophytes. It is uncertain at present whether the gnetophytes belong in their own separate box or within another of the seed plant boxes. It is clear that they do not belong in the angiosperm box, however.
The angiosperms or flowering plants must have a big box. They make up about 90% of the plant kingdom. There are several boxes inside their box. A couple of very small boxes hold the first branches – the water lilies and the anise tree. Then there is a small box labeled “magnoliids,” a medium box labeled “monocots,” and a large box labeled “eudicots.” Three-quarters of the flowering plants are eudicots; about 22% are monocots.
All this can be imagined, but it will take quite some creativity to make physical containers that can actually hold an image and information about each of these branches of the plant kingdom. The information should include the lineages of the plant. For example: Sunflower lineages – embryophytes, tracheophytes, euphyllophytes, spermatophytes, angiosperms, eudicots. The text should also give some of the defining features – the derived traits – of each group.
If you need the illustrations or more information, see https://big-picture-science.myshopify.com/collections/montessori-botany-materials/products/the-plant-kingdom. This is a pdf of a PowerPoint for teacher education. You can print the images for use in your classroom. It has all the images you need except quillworts. Those lycophytes are rare, and the main reason to include them is that they are the closest relatives to the ancient Lepidodendron trees.
Please let me know if you need help or have questions on plant kingdom nesting boxes. If you want to have another set for the flowering plants, that’s a more involved story. It would be fun to do, however.
Happy plant explorations,
Priscilla